← Home
Net/Works Computer Consulting LLC
Car Health Data for iPhone

iPhone App Help

Learn how to link your account, connect a Bluetooth Low Energy OBD-II adapter, record a drive, understand the live display, and diagnose common connection problems.

What the App Does

Car Health Data connects your iPhone to a compatible Bluetooth Low Energy OBD-II adapter. During a recording session, the app reads supported vehicle measurements, displays them live, and sends the recorded information securely to your Car Health Data account.

Drive safely: Set up the adapter and begin recording before driving. Never operate or troubleshoot the app while the vehicle is moving.
2

Connect the OBD-II Adapter

Plug the compatible BLE OBD-II adapter into the vehicle's diagnostic port before opening the scan screen.

  • Park the vehicle safely.
  • Plug the adapter firmly into the OBD-II port.
  • Turn the ignition on or start the engine.
  • Make sure Bluetooth is enabled on the iPhone.
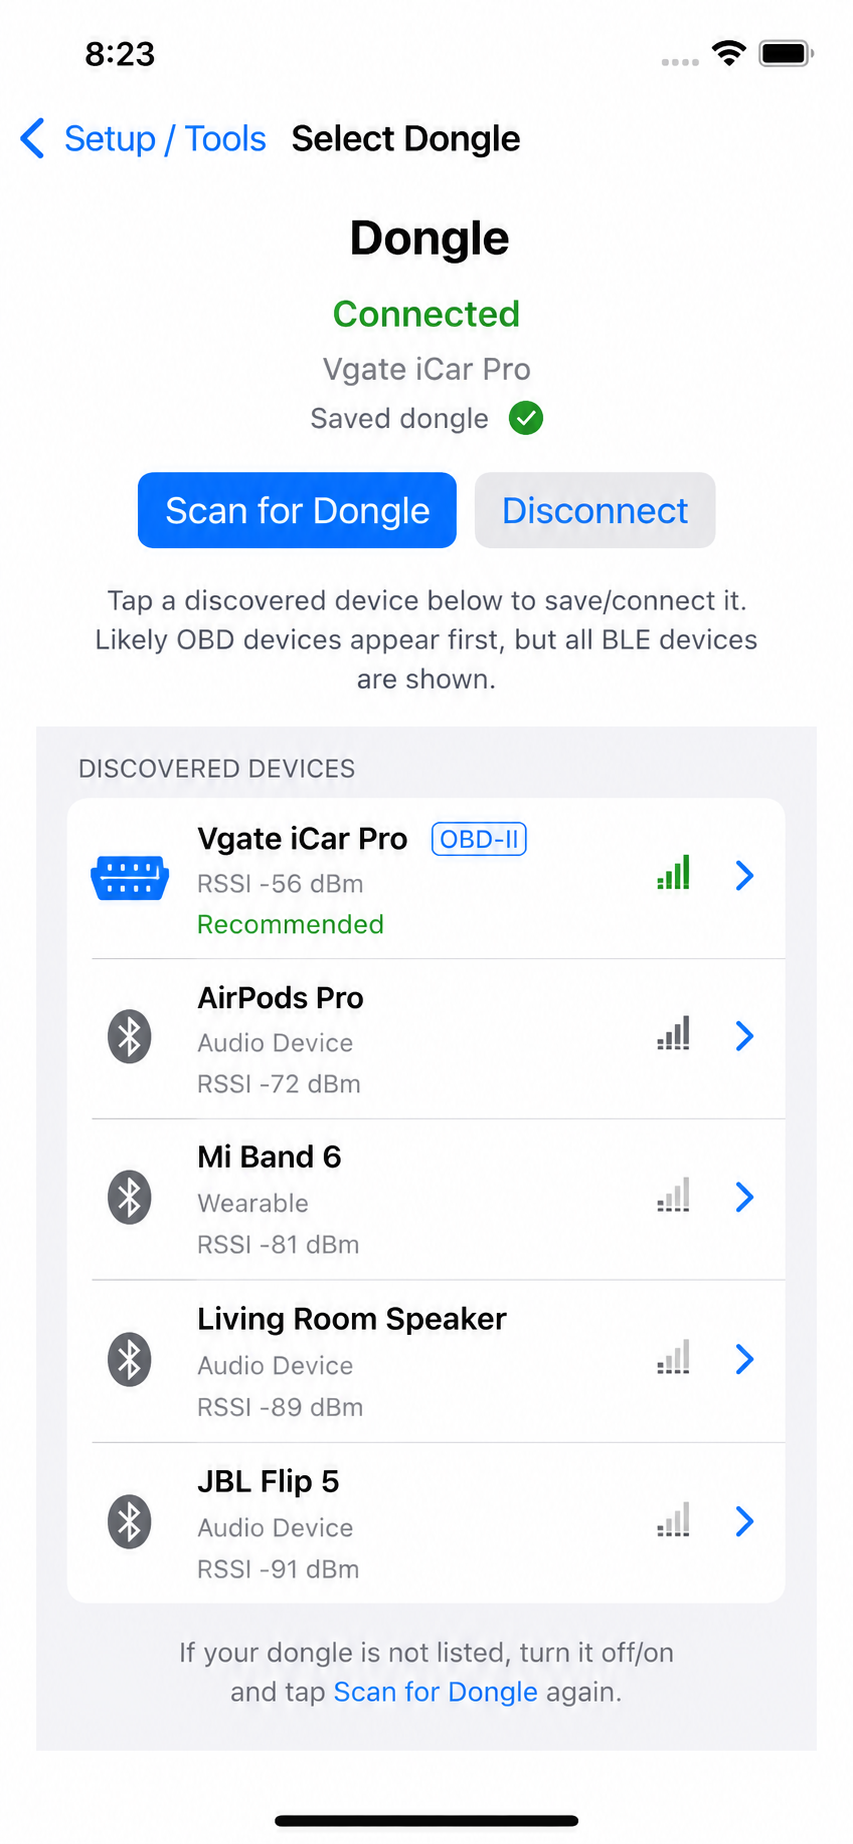
  • In the app, tap Setup, then Select Dongle.
  • Tap Scan for Dongle.
  • Select the recommended OBD-II device.

The chosen device becomes the saved dongle. The app can reconnect to it during later sessions.

The scan list may also show headphones, speakers, wearables, or other nearby BLE devices. Select only your OBD-II adapter.
Car Health Data Select Dongle screen showing a connected Vgate iCar Pro and other discovered Bluetooth devices
Likely OBD-II adapters appear first and are marked as recommended.
3

Start and Stop a Recording

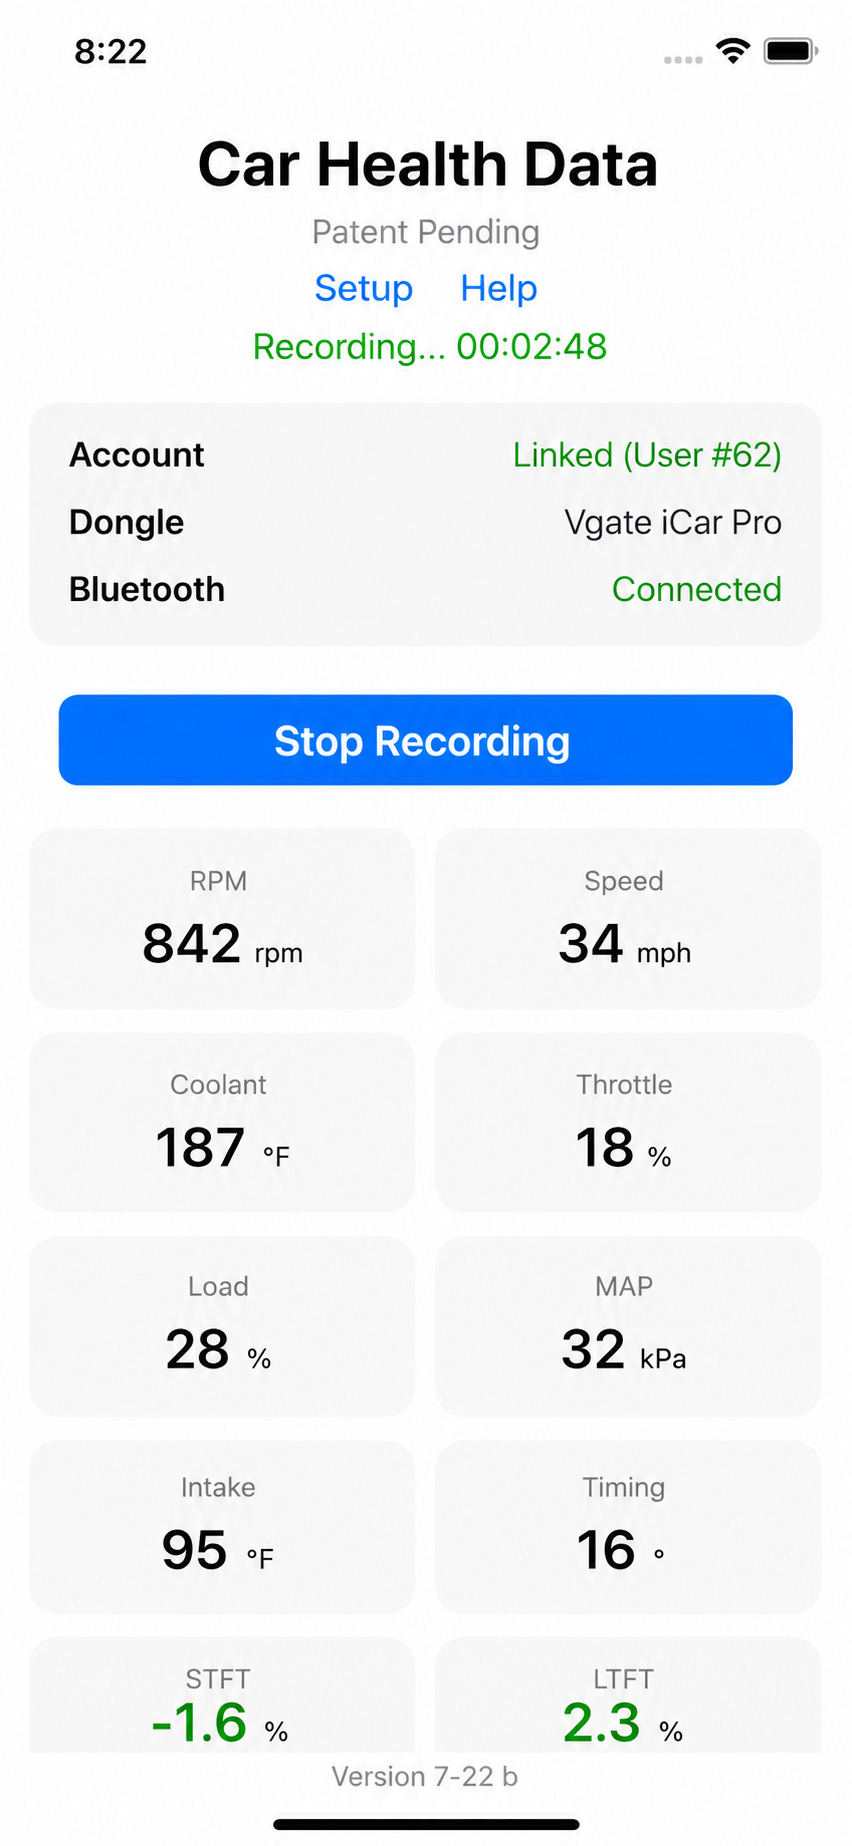
Before beginning, verify the three status lines near the top of the main screen.

Account

Shows whether the app is linked to a Car Health Data user account.

Dongle

Shows the name of the saved OBD-II adapter.

Bluetooth

Shows whether the adapter connection is active.

Recording Timer

Displays how long the current recording has been running.

Tap Start Recording before driving. While recording, the button changes to Stop Recording. Tap it when the drive or test session is complete.

Important: Start and stop recordings only while safely parked, or have a passenger operate the app.
Car Health Data iPhone main screen showing a live recording and vehicle data
The main screen shows connection status, recording time, and live measurements.

Understanding the Live Data

Measurements depend on the vehicle and the information supported by its engine-control system. Not every vehicle provides every measurement.

RPM

Engine speed in revolutions per minute.

Speed

Vehicle speed reported by the control system.

Coolant

Engine coolant temperature.

Throttle

Reported throttle-position percentage.

Load

Calculated engine load under the current conditions.

MAP

Intake-manifold absolute pressure, usually shown in kPa.

Intake

Temperature of the incoming air reported by the vehicle.

Timing

Reported ignition timing advance.

STFT

Short-term fuel trim, showing immediate fuel adjustment.

LTFT

Long-term fuel trim, showing learned fuel adjustment.

Live values are informational and may be delayed, unavailable, or unsupported. They should not be treated as a substitute for professional vehicle inspection or diagnosis.
4

Use the Diagnostics Screen

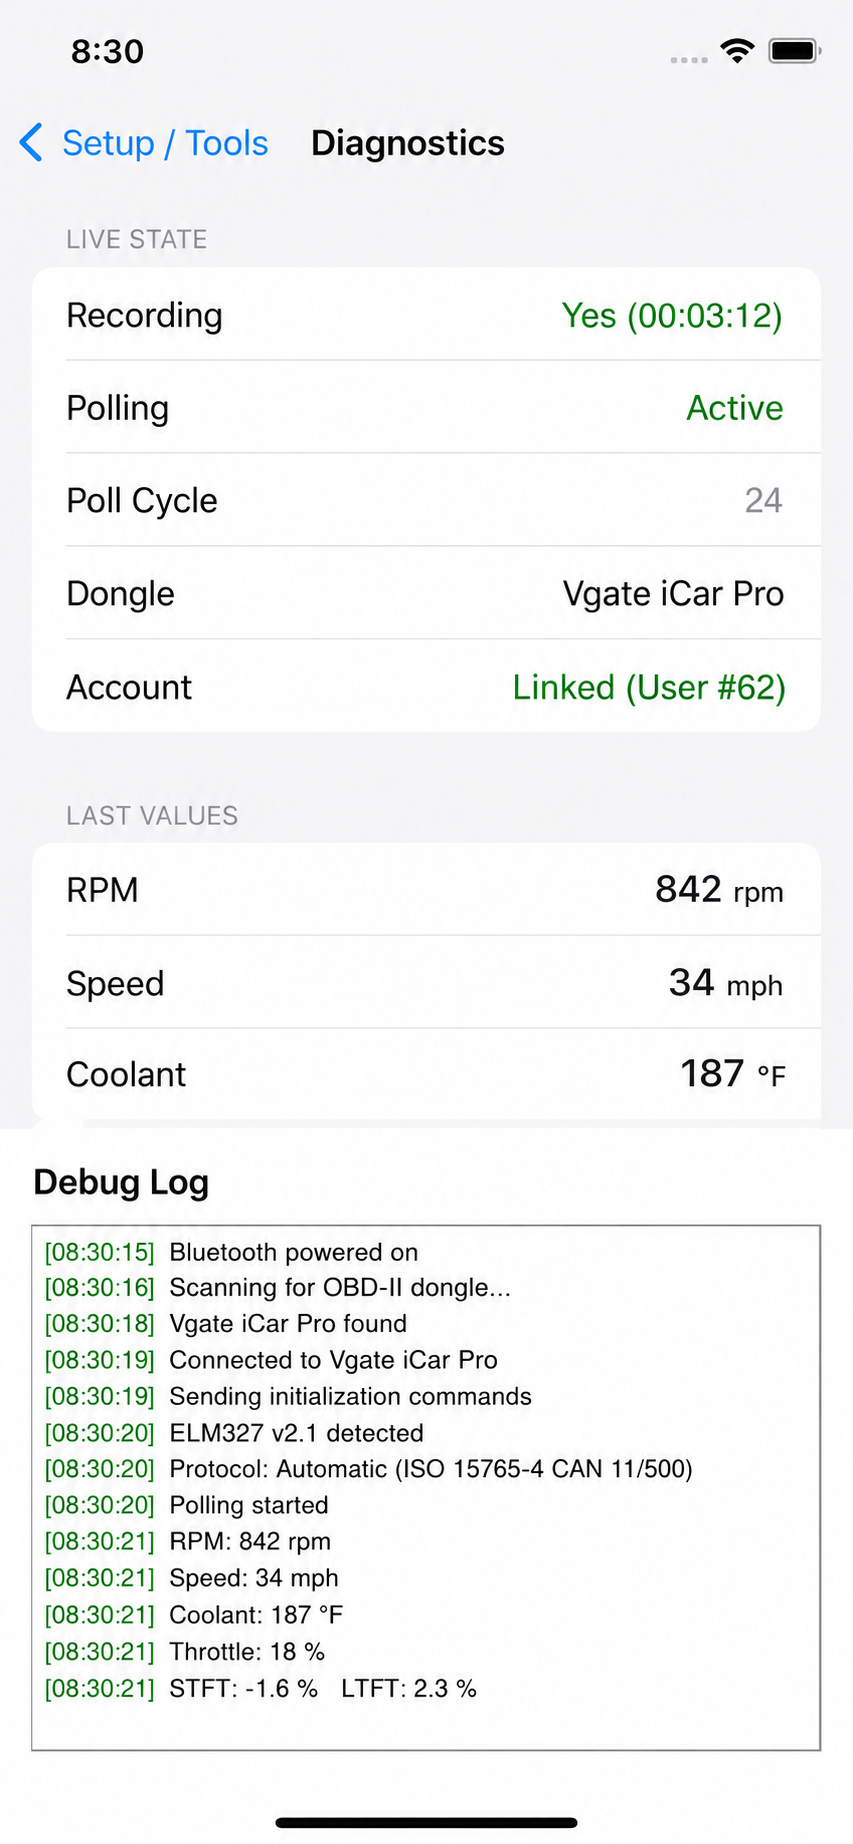
The Diagnostics screen is primarily a troubleshooting tool. It helps confirm whether the app is recording, polling the vehicle, and receiving data.

  • Recording shows whether a session is active.
  • Polling shows whether the app is requesting vehicle data.
  • Poll Cycle shows the current request cycle count.
  • Dongle identifies the active adapter.
  • Account confirms the linked user.
  • Last Values displays the latest received measurements.
  • Debug Log shows connection and communication events.

When contacting support, a screenshot of this page can be especially useful.

Car Health Data Diagnostics screen showing recording, polling, last values, and a debug log
Diagnostics confirms the connection sequence and most recent vehicle responses.

Recommended Use

Troubleshooting

The OBD-II adapter does not appear in the scan list.

  • Confirm that the adapter is firmly plugged in.
  • Turn the ignition on or start the engine.
  • Make sure Bluetooth is enabled.
  • Move the iPhone closer to the adapter.
  • Unplug the adapter briefly, reconnect it, and scan again.

The adapter appears, but it will not connect.

  • Close other OBD-II apps that may be using the adapter.
  • Disconnect the adapter from another phone or tablet.
  • Use the app's Disconnect button, then scan and select it again.
  • Restart the adapter by unplugging and reconnecting it.
  • Restart the iPhone if Bluetooth remains unresponsive.

The app connects, but no vehicle values appear.

  • Verify that the ignition is on and the engine is running.
  • Allow several seconds for adapter initialization.
  • Open Diagnostics and look for polling activity.
  • Check the debug log for initialization or protocol messages.
  • Remember that some vehicles do not support every requested measurement.

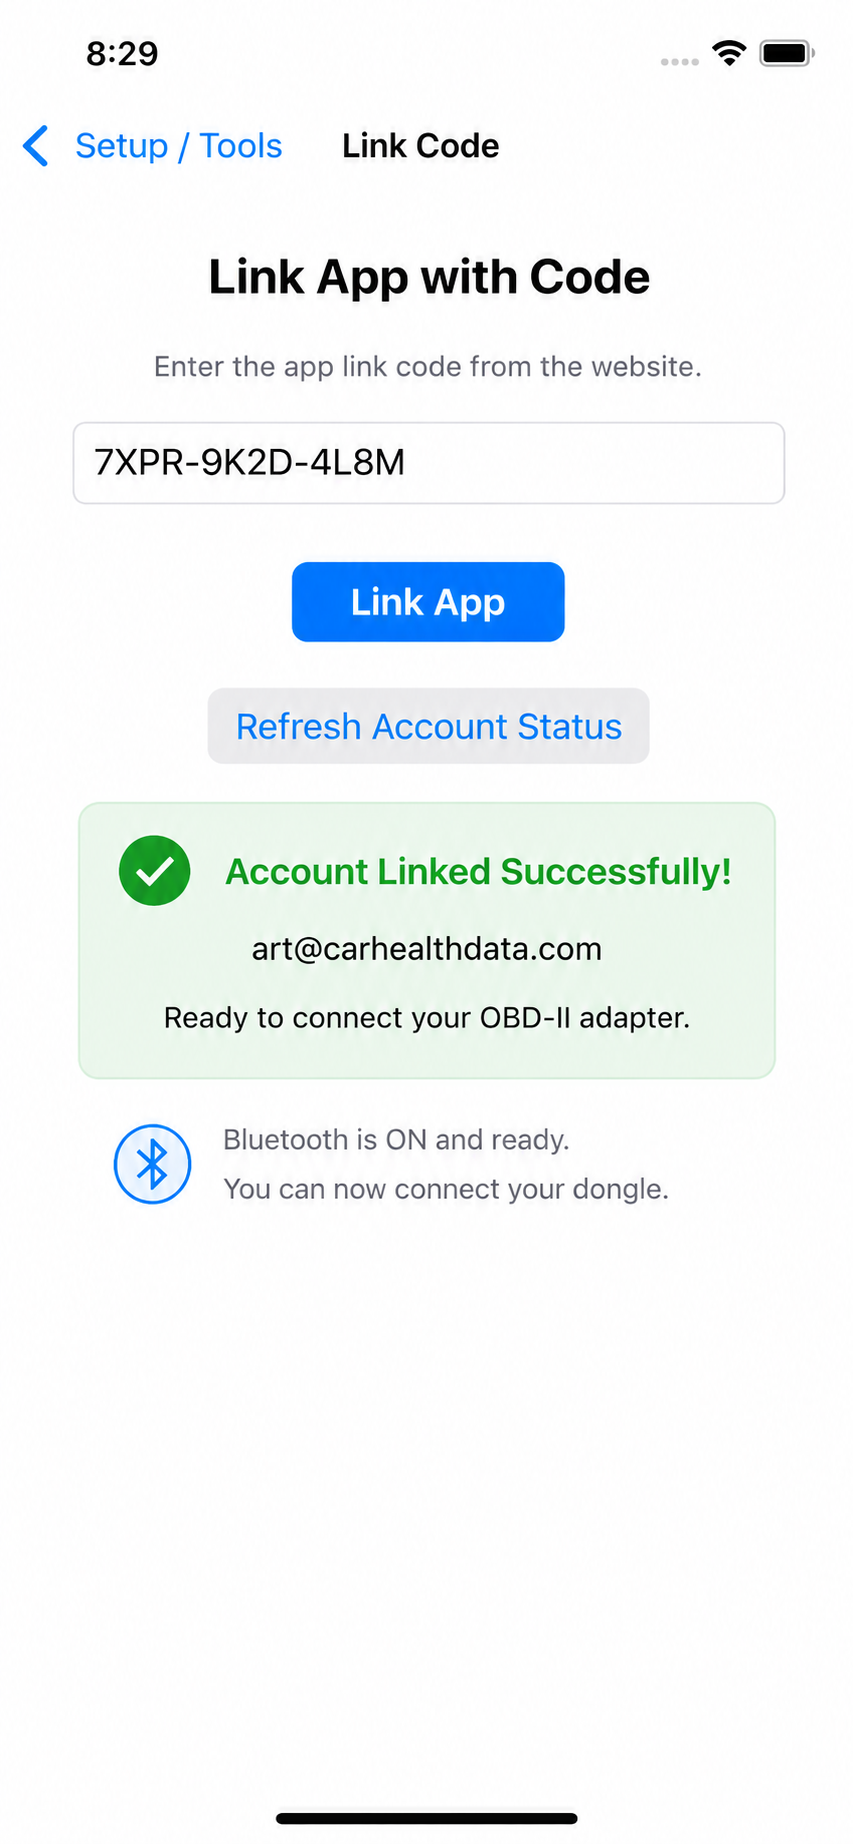
The account link code is rejected.

  • Generate a new link code on the website.
  • Enter all letters, numbers, and hyphens exactly.
  • Confirm that the iPhone has internet access.
  • Do not reuse an expired or already-used code.

The app previously worked but no longer reconnects.

  • Confirm that the saved adapter is receiving power.
  • Open Select Dongle and tap Scan for Dongle.
  • Select the adapter again if necessary.
  • Use Refresh Account Status if the account display seems outdated.

A measurement is blank or does not change.

The vehicle may not support that measurement, the value may not be available under the current operating condition, or the engine-control module may update it less frequently than other values.

Does the adapter need to remain plugged in?

It must remain plugged in while the app is reading vehicle data. Some adapters continue drawing a small amount of power after the vehicle is turned off. Follow the adapter manufacturer's instructions, especially when the vehicle will be parked for an extended period.

Need More Help?

Please include your iPhone model, iOS version, vehicle year and model, OBD-II adapter name, a description of the issue, and screenshots when useful.